Search This Blog

Tuto 4: Photographer in the dark (tutorial for night photography)

Before starting


Hello and welcome to this new tutorial session!
This time I'll explain you my method of work to take photographs by night. I particularly like black and white applied to night photography, I think it's a good way to create cool atmospheres with sharp shadows and textures (special mention for rainy night shoots).
Unfortunately I didn't had much occasion to practice it, the fault to a serious lack of time. But I had enough time to practice the technic, I will introduce mine here.


Things you need

The main stuff you must have for night photography (in addition to your camera, of course) is a tripod. I first bought a cheap one, just to practice and make my opinion about my real need. I'm now looking to buy a better one; I'll probably make an update here when I'll have choose one. By the way, my cheap tripod permitted me to notice that for a frequent use, the quality of the tripod seems to be a thing to care about a lot.
I noticed two things that my first tripod doesn't offer: solidity and stability.  Stability in some cases, for example when there is a lot of wind, even with some ballast on it, it was often shaking. And solidity that decreased a lot after less than one year of an infrequent use (resulting on a decrease of stability). Thus, if you're a beginner or if you just don't have a tripod, I suggest you to really choose it with care and to put a minimum of money on it...

Another thing that should help for night shoot is a remote controller for your camera. This will be helpful to trigger your camera without shaking.
There are many sorts of them: wired or infra red for example. Personnaly I bought a Nikon infra red remote controller, it works well if you stay relatively close to your camera...


The objective

I'll try here to explain step by step my way of shooting by night in fully manual mode. Why this mode? Because after several tries I found it was the best way to really get what you expect for this kind of work (even if a auto/semi-auto mode would probably gives you good results, although ...).


First step: what I like to shoot at night

Applied to my passion for black and white, I like to do night shots of specific subjects. Lightened places with strong shadows, monuments or moving lights are what I really enjoy (and always applied to a street ambiance if possible). So the first thing to retain is to try to make yourself happy! The rest depends of you...


Step 2, setting up my gear: The tripod


I'll have a stuff by stuff approach, starting with the tripod...
The very first thing I do once I have chosen the angle of view, is to install my tripod at the correct place. I try to make it as stable as possible. If the tripod has a hook under it, it is possible to hang a bag heavy enough to make the tripod more stable.
It is important to take the time needed to refine the point of view from which the photo will be taken: correct height? Correct angle? For a landscape, is the horizon horizontal? WHat can I see exactly on my viewfinder? Your composition will only be better!


Step 3, setting up my gear: The lens

The first thing I do on my lens when doing night shots with a tripod is to turn off both the AF and the vibration reduction modes (this last one could create ghost vibrations if turned on on a stable tripod).

Then, once I choose my subject and installed my camera on the tripod, I try to make the right focus. The reason I turned of AF and do it manually is simple: AF on dark places isn't always efficient, and... I have time to focus properly, my tripod won't go away (at least, my subject could :).

If I want to focus on a precise spot, I adjust it through the lens with the focus ring.
If I want to focus on a landscape, or if I just can't focus on anything because it's too dark, I use the hypefocal: you obtain it by setting your focus ring on the infinite position. The advantage of this method (used with a small aperture), is to cover a huge sharpness field (just be sure to be at the minimum distance from your subject to avoid unwanted blur).

Here is an example where I used the hyperfocal because it was too dark to see anything for a good manual focus:


Step 4, setting up my gear: the camera

This is not necessarily the most difficult part of the job, but this is the part where there is many little things to think about that we can easily forget. I think it would be more efficient to list all this things on a check list, because this is like a "ritual" you could repeat each time and adapt to situations. So, there is no order, but I like to proceed like this, in manual mode:

- File format: I prefer to shoot in RAW (as usual), to have more flexibility during post-production (PP).

- White balance: On auto mode, RAW files allow to adjust it easily on PP.

- Adjust the sensitivity: I usually put it on 100 ISO. I think you can go up to 400 ISO depending on your material and the exposure time needed to get what you want. I just take care not to be on auto-ISO mode...

- AF: In case I forgot to turn it off on my lens, I turn it off on the camera too, just in case...

- Aperture: At your own, depending on your subject and feeling. Usually a little aperture for landscape, a bigger one for life scenes, people or details...

- Metering: I think I always used it on evaluative mode...

- Shutter speed: This is the last important parameter that I set up. I adjust it live, while looking at the exposure indicator in the viewfinder and try to get it at the right place (e.q. 0EV). This is for the theory, but in fact, depending on the situation and what I expect from my shot, I can go to overexposure if I need a longer exposure, for example for this kind of result:


In some special cases, like for astrophotography, thunderbolt-photos or really dark scenes, you could go for the "Bulb mode" which allows the photographer to fully manage the exposure time: you pull the trigger when you want to start the exposure, you pull it again when you want to stop it. This option is available on serious cameras and allows exposure time of 30 secondes to several hours (think about having enough battery).

There is no magic formula, as in cooking, it's all about balance of these ingredients for a harmonious result. I often make several attempts before getting the right result ... 

Step 5, remote controller and "mirror up"

As I said above, I use a nikon infra-red remote controller, it allows me to trigger my camera without adding motion blur. 
If you want to go really deeper about controling the vibrations, here is a last tip: use your remote controller on "mirror up" mode (if available on your camera). I won't go on hard explanations, Wikipedia does it better than I: "Mirror lock-up involves flipping the mirror up well before the shutter opens, allowing the vibrations to die down before exposing the film".

Final step, some examples

Finally, here are some photographs I took using the way I just described, just one among others...


Tuto 3: A walk with the Lensbaby Composer

Before starting

Hi everybody! Many time has passed-by since my last tutorial. My life changed a little since the 21th of November: I'm now the father of a little Mahé, a wonderful little boy that brings us much happiness... and eats all of our time! This being said, and now that you shed a tear (yes yes), I'll talk to you about a particular lens that I discovered there is not so long. Its name is the "composer lens" and it's proposed to us by the Lensbaby firm. Those lines won't really be a tutorial but more an introduction about this lens, a way to use it, and why I found it interesting for my black and white work.

Things you need

Before starting, and if you'd like to know more about Lensbaby, you should visit the official website of the firm, this is over here: http://lensbaby.com.

The objective

The firm proposes many lenses and optics (and accessories too). The idea here isn't to introduce their catalog (I own no lensbaby action), but to focus (it's the case to say, you'll see) on the one I bought: the Composer (http://lensbaby.com/lenses-composer.php).

Special thanks


Before starting, I must admit that I discovered this lens thanks to a photographer called Victor Bezrukov  that I discovered on Google+, and his Lensbaby album. I really suggest you to have a look at him and his gorgeous work!

First step: The idea

I bought few months ago a lens called "the composer". That's a good thing, I just wanted to compose some nice photographs thanks to it. 
In short, the idea of this lens is to manage the sharpness field (or the blur field, make your choice) of your photographs, more accurately than just by playing with aperture and depth of field. 
In fact, this lens allows you to add a second level of blurring: after making the focus on your subject (as you usually do when taking a photo), you'll be able to add blur on the spot of your choice on the focused field.

If you understood, I won, if not, an example should be better! Here is the kind of images the composer can lead to:


I first focused on the plan of the motorbike like with any lens, and then moved the sharp part of the photo on a precise spot of the subject so that it's the only clear part of the photo.

Step 2: The lens

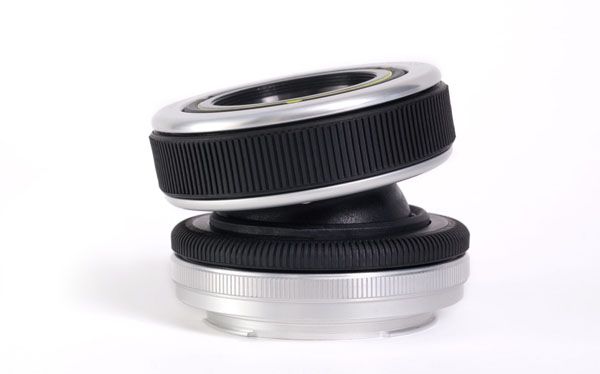
This result is possible thanks to the particular built of the composer lens, as you may notice:


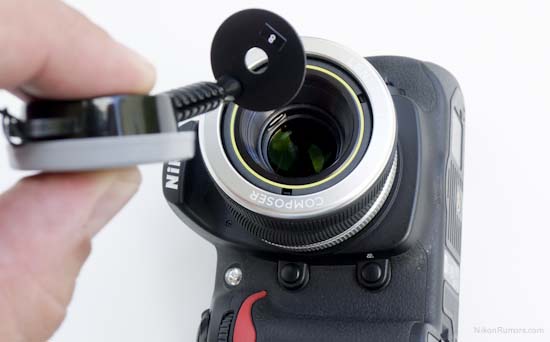
The composer is a 50mm lens. It has manual focus and manual aperture: it's your job to change the aperture rings as you want, thanks to a special magnetic tool (from f2, when no magnetic ring is engaged, to f/22):


I didn't read any review of this lens, but based on my own experience, it seems to begin to be sharp at f/2.8 (I don't think we can consider it sharp at f/2).

The focus ring works like on any other lens. There is another ring that allows you to tighten the position of the moving head of the lens.
To use the composer, you can set your camera to aperture priority or manual mode...

After focusing thanks to the focus ring, you just have to swivel the lens' head to move the sharp point where you want on the frame. It doesn't look that hard, the most difficult thing will be to do it quick if you use it for street photography for example. In other words, mastering this lens implies few times of practice.

Final step: Why I like it?

For its main effect, of course. I find on it an excellent way to highlight to the extreme the subject or the idea of a photograph.
For street photography, it can add a particular dynamic to a scene, particularly for moving subjects:


I also like to bring out my subjects thanks to the composer:


The last way I like to use it is for the photography of details. It gives me the impression of shooting with a classical lens, while zooming in or out with a long exposure (I'm not sure you see what I mean here...):


I didn't really try it yet for landscape and architecture photography, but I expect it has a good potential (for example by doing an extreme focus on a building for a street panorama view. Maybe I'll post an example of that when I'll have done one!

See you soon,
Damien

Tuto 6: Trick to get 5 auto-braketed photos with a Nikon D7000

Before starting

Here's a little trick I use with my Nikon D7000 to get quickly and easely 5 auto-braketed photos with increments of 1EV. This can be useful to process HDR images with more informations than when processing from 3 braketed photos (refer to this tutorial for this point: Braketing for HDR).

Things you need

Your Nikon D7000 and its manual (in case you don't know how to use U1 and U2 instant recall mode).

The objective

Configuring U1 and U2 mode in order to quickly take 5 auto-braketed photos. One reason to use 5 photos instead of 3 is the amount of noice generated on the HDR image: it is much well controled. I also noticed better results depending of the scene you are working on.

The trick

 If you own a D7000, you may know that braketing is limited to 3 photos, with EV increments of 0.3, 0.7, 1.0, 1.3, 1.7 and 2.0. Usually, I use braketing of 3 photos with a 2EV increment between each.
If you own a D7000, you may also know that it proposes an interesting option that allows you to create two different user profils (called U1 and U2):


For each profil you have the opportunity to save any shooting scenario you want (i.e. A/S/M mode, file type, white balance, ISO, and all the others stuff you usually use).


The idea to get 5 auto-braketed photos is to configure U1 and U2 modes as following:

U1: bracketing of three photos with 1EV increment.
U2: bracketing of three photos with 2EV increment.
Note that apart braketing parameters, all other parameters should be the same from U1 to U2.


Thus, when I shoot the three photos with U1, and then shoot three photos with U2, I'll get six photos (with a duplicate one) with those expositions:

-2/-1/0/0/+1/+2

Just delete one of the duplicated 0EV, and you have 5 auto-braketed photos with 1EV increment, just by switching quickly the U1/U2 mode.

Next step will be HDR processing, this way: http://bwtutorials.blogspot.com/2011/10/tuto-2-hdr-for-black-and-white-with.html


Tuto 5: Split toning with Lightroom

Before starting

Here we are for another complement of tutorial (more than a tuto). I will show you how to play with the split toning menu of lightroom...

Things you need

Nothing special, just the desire to try something new.. :)

The objective

The split toning will allow us to color our photo with grey levels. We can add only one colour for the overall photo, or affect a specific color to the highlights and another one for the shadows. I often use this technique for aging a photo. I will show you how to transform this classic black and white photo:


Into this timeless one:


First step: Setting up highlights

We have to go to the Split Toning menu of the develoment mode of Lightroom. For the expected result, I chose a color to apply to the highlights of the photo with the "Hue cursor". I chose a color which tents to the yellow, with the appropriate satturation:


Step 2: Setting up the shadows

I do the same for the shadows. I general I chose a color which tents to the blue with a low saturation level:


Last step: Balancing

After setting up highlights and shadows, I play smoothly with the balance cursor in order to equilibrate the effect between the highlights and the shadows:


We are done with that! Just keep in mind that there is nothing more efficient than practicing and trying things by yourself! Those tools are as powerful as easy to use, the most "difficult" thing is to understand how they work. If you get that, you get all!

Damien

Tuto 4: "Spot removal" tool on Lightroom

Before starting

This article can be consider as a complement of tutorial more than a tutorial. I just wanted to highlight a particular tool proposed by Lightroom: The spot removal tool.

Things you need

Lightroom, of course, and a photograph with some defects to correct...

The objective

The spot removal tool is another powerful tool very simple to use. I use it as soon as I have to remove imperfections from a photo (for example those two people installed far away on the beach that I wanted to take in photo). More generally, it will be little details to remove or traces of dust.

We'll see here how to remove this little red thing


After:


First step: Setup the tool


1: The spot removal tool is available on the top of the development menu, by clicking the white circle.

Then, you have to choose between two modes:

2: Clone mode: Applies the sampled area of the photo on the selected area.
3: Heal mode: Applies the texture, the brightness and the shadow of the sampled area of the photo on the selected area.
4: Adjust the size of the area you want to correct.
5: Adjust the opacity of the selected area.

Step 2: Heal mode

For this example, I use the heal mode in order to apply a duplicate area with the correct texture, brightness and shadow: this is exactly what I want in order to do a smooth correction.
Once the setup of the tool is done, I adjust the selection circle on the area I want to correct:


Then, I just click on it. Lightroom will automatically duplicate an area near to the spot I clicked on:


To finish, I can adjust to my convenience the right circle to get the expected result (by changing its size or moving it on another area).

Step 3: Clone mode

As you understood, the clone mode will allow me to make a perfect copy of an area to another. The way to use it is the same as for the heal mode. Here is a simple example:


Hope you enjoyed that, see you soon for another tuto...
Damien

Tuto 3: Braketing for HDR photo

Before starting

After I published my tutorial for HDR processing, some people asked me what was exactly braketing and how it works. My apologize, I should have explain it before. It's true that even if for experimented photographers talking about braketing is like talking about the sunny daylight, it's not an obvious thing for beginners or just curious people. I'll correct my mistake on this tutorial, explaining what is braketing and how to apply it for HDR.

Things you need


Of course, you'll need a camera capable of braketing (even if you don't yet know what it means, you can read your stuff manual to verify that).
In the HDR context, you'll need a tripod (or a powerful arm).
Not a "must have", but it could help, it's a remote trigger.
I'll explain all this below.

The objective


As you may have understood by reading my previous tutorial (I hope), HDR consists of fusioning three (or more) photos with different exposures in order to obtain a unique photo well-exposed.
Braketing is the method that will allow us to take a serie of several photos with different exposures for a same scene. Let's see how to get that!

First step: No move!


The condition to get a good HDR result (even if Photomatix can align source images) is that photos taken with braketing are well aligned (or look exactly the same, just exposure must seem to have change).
Knowing this, for a three or more continuous capture, there is not much solutions: we'll have to use a tripod.
I talked to you about a remote trigger, it's also a good way to limit vibrations for this type of shooting (or maybe you can shot faster than your shadow)... I'm talking about vibrations that could occur at the moment you pull the trigger of your camera, but this is especially true for night shooting where vibrations are much bad than for day one's.

Next step: Braket!


I will not explain how to use braketing on your camera, but just the idea of it, how I manage it on my D7000. So please refer to your camera's manual!

The Nikon D7000 allows bracketing for up to three shoots with several increments of Exposure Value (EV, remember that acronym and refer to google for more information about it). When I shoot for HDR, I usually set up a bracketing of three photos with increments of 2EV. I also put the D7000 on continuous capture mode.
This means that at each shoot, I'll get the following three photos:

- The photo I saw through the lens, with an average exposure (I set up exposure metering on matricial mode, refer to your camera's manual if needed),
- An under-exposed photo (-2EV compared to the first one),
- An over-exposed photo (+2EV compared to the first one).


I always shoot RAW files to be able to adjust exposure at my own, without loss of quality.
This three photos represent the base of my future HDR work.

For next steps about HDR processing, go to the Tuto 2: HDR for black and white (with Photomatix plugin for Lightroom page.

Tuto 2: HDR for natural looking results (Video at the bottom)

Before starting

Hope you appreciated my tuto about black and white processing with lightroom? Feedback about it were good so thank you!
I'm now going to show you how to make an hdr black and white photo with the photomatix plugin of lightroom. If you didn't already read it, I suggest you to follow this link and read these few words about the HDR technic, just in order to clearly understand what will happen here.

We are going to see two ways to produce a HDR photo. First, from three photos (or more,with different exposures) taken with braketing method (Tuto 3: Braketing for HDR photo). Then, from a unique photo that we duplicate with different exposures (here, the RAW format is highly recommended).

Note that a video is available at the bottom of the page for a live demonstration.

If you're done with that, let's go to the next step!

Things you need

You'll need to have two software installed on your computer: Lightroom and Photomatix. First thing you shall verify is if your photomatix plugin is correctly detected and enabled on Lightroom. You can check that on your Lightroom plugin manager:


If you want to do HDR from a unique photo, you must capture it with the RAW format, in order to duplicate it and modify the exposure without altering the photo quality.
If you want to do HDR from the three photos you took with braketing, the need of RAW files is not really true because if Lightroom can handle RAW files, Photomatix can't (and will convert RAW files into JPEG). In the case you have RAW files, I suggest you to convert them in JPEG using Lightroom instead of Photomatix (the result will be a bit better), we'll see it just after.

The objective


Let's imagine you wanted to take a photo of a beautiful railway, with a wide-angle lens, in difficult conditions (typically, high variety of contrasts and brightness). It will be difficult to do the perfect shoot in just one photo.
For this first part, we'll see how to obtain from this three braketed images (click to enlarge):


        Under-exposure                     Average-exposure                      Over-exposure


A correctly exposed HDR photo that we will then convert in black and white:


Just a note about braketed photos: I use a Nikon D7000 that allows me to braket only three photos. EV increment can be of 0.3, 0.7, 1.0, 1.3, 1.7 and 2.0.
In most cases, I use braketing to get three photos with increment of 2EV which was good on all situation I met. It's up to you to know what is possible with your stuff!


First step: Import files on Lightroom

Let's imagine that your three braketed photos are in RAW format. First thing you have to do is to import them on Lightroom. There is no adjustment to do right now, just maybe apply a lens correction profil to your three photos. For example:


Step 2: Convert RAW into JPEG with Lightroom

As said before, it is much better to converte RAW files in JPEG with Lightroom. To do so, make a selection of your three bracketed photos (ctrl+click), and choose "export":


I then select the JPEG format and use the maximum quality setting. Click export to convert your RAW files into JPEG:


Step 3: Import JPEG files into Photomatix

We are now going to import our three jpeg files into Photomatix. Just select them in lightroom (ctrl+click, again), and choose "export -> photomatix":


The following window appears. We want to make one photo from three, they would better be aligned. To be sure of that, I tell photomatix to align images and crop aligned result. I also ask it to automatically re-import the HDR result into lightroom in JPEG format. Click "Export" to go to Photomatix:


Step 4: HDR adjustments with Photomatix

Photomatix opened itself and shows an overview of our future HDR photo. You can notice the main Photomatix adjustment menu on the left and a histogram next to it:


Here are the main settings I usually adjust (up to you to play with others :):

Strength: My goal is to get an HDR looking natural. After several tries I understood that this parameter had to be at its maximum (100).

Color saturation: Adjust it at your convenience, I always try not to over-saturate colors here.

Luminosity: Same thing here, play with it till it's good for you.

Microcontrast: Modify the overall contrast of the scene. To the left for a painting aspect, to the right for a most natural looking aspect.

Smoothing: It allows to play with the exposition of the HDR image on different zones according to original imported JPEGs. Adjust it with caution in order to give maximum harmony to your photo!

White/black Point: Adjust them in order to avoid under and over-exposition on your image (refer to the histogram and make sure there is no overflow on the right or the left of it).

If you're done with adjusments, just click "save and re-import". The final HDR image is directly imported on Lightroom. You can work on it like on any other photo. So, for a black and white conversion, you can refer to the first tutorial for black and white processing with Lightroom. Here is the kind of result you'll be able to get:


Step 5: HDR From a unique RAW file

In the case you couldn't do braketing to get different exposures for a same photo, it will be possible to get approximately the same result from a unique RAW file of your photo.
Here is the idea: Lightroom allows to do virtual copy of a file. So, if your original RAW file is on a average exposure, you'll be able to do two virtual copy of it and modify their own exposure with Lightroom (on development mode): one will be the over-exposed file (for example, +2 on exposition), the other one the under-exposed one (-2). To do a virtual copy, just select your RAW file and choose "create virtual copy":


At this state it's like if you just did three photos with braketing. You can go back to Step 2 of this tutorial to continu your HDR processing.

Video Example

Here is a video example I made to illustrate this tutorial. I just followed step by step what I explained here (with just few variations).


Here is the result I get from that video (after few more tweaks on lightroom):


Damien

Charity and photography with 100cameras.org


Here is a great initiative driven by the site 100cameras.org.

"100cameras identifies children living in unjust conditions and gives them cameras to document their lives. Their photo narratives are used to raise awareness and capital to meet physical needs and empower sustainable growth within their community".


If you're interested by participating to that great project, you can make donation there:

Few words about HDR

The next tutorial I'll share here will talk about black and white HDR photographs. Thus, I thought those lines would be really helpful before I upload it and you read it.

The first question you may ask would be "what does HDR mean?"... HDR is the acronym for "High Dynamic Range". The simple explaination could be "that's a way to make your photographs looking like what you see in real life".
If I go deeper, I would say that your eyes can capture images with high differences of intensity and contrasts, things that your camera's sensor, even if it's better and better, can't make without post-production.

So, without going too deep with technical stuff, the objective of HDR is to fuse several instances of a same photo with different expositions, in order to get a unique photo which would be well exposed everywhere.


An example is better than words. I took this picture with a cloudy sky which means a high brightness sky. In this case, you don't have much choice: you can expose the little wood or the sky, but not both... This is where HDR comes. The first photo is the original shot, the second is the same processed with HDR (using photomatix without any adjustment). I let you make your own opinion...


If you want more information about it, if you want to know what is tone mapping or other stuff, you should trust google and make some searches.

Damien

Tuto 1: Black and White processing with Lightroom

Before starting

Here we are, serious things begin. First I must admit I'm very happy to share this tutorial with photographers or curious people. As a reminder, you won't find here THE way to do black and white conversion, but just A way (that may help you to get YOURS).
Everything is about sharing, so feel free (to share this tuto, of course) and to send me your feedbacks and own methods, there is always something to learn!

UPDATE: I just added a video example of blak and white processing at the end of this page. Note that I made it using the new Lightroom 4 version...

Things you need

Of course, this is a Black & White conversion tutorial using Lightroom, so it would be nice if you had it. I don't know photoshop very well, but this is Adobe and the few things I saw about it let me think that what I'll do here could be easily done with it. Same thing for The Gimp I guess...

Of course you'll also need a (good) photograph. This type of conversion implies to do some heavy manipulations that could have bad influence on your photo if it's not of a certain quality. I think high resolution images are a good start, I'm sure that RAW files are essentials. I shot using a Nikon D7000 that allows me to capture RAW files, you should do so if possible. I won't talk about my lenses, I prefer to shoot with normal prime lenses, known for their optical quality and sharpness...


The objective

So, we are here to "transform" a coloured photograph into a Black & White one. In order to be as understandable as possible, I'll use an example with a screenshot for each phase of the process. I recommend you to save all photos of this tuto on your hard-drive in order to make them scroll on your picture viewer (in order to highlight evolutions between each others).

I'll show you how to transform this:


into that:


First step: Cropping

You know it, cropping is an important step. In this case I think a square format would be more adapted, the right part of the photo being not really interesting. To do so, I go to the crop menu (in development mode):


First, I make the horizon horizontal thanks to an angle modification (possible by manipulating the cursor on the right, or directly the picture).

Then, I choose the 1x1 aspect (means square format) and adjust it on the photo. Of course, as all good student, I try to respect the rule of third... It's easy here, the phonebox will be the main subject on the left. On the right, I'll try to highlight the trees on the background and the lines of the sidewalk: success in black and white is a question of harmony, it's highly recommended to play with shadows, contrasts, textures and... Lines!


Step 2: Black and white activated


We go now to the treatment menu. First I adjust the white balance (using the pipette on a neutral point). I then fix the exposition with the good cursor.
An important thing, to my mind, is to "boost" brightness and contrasts, what will give you a most impacting result.
This being done, you can turn you photo into black and white (I do it by clicking on the "black & white" button).


I really like to play with the "clarity" cursor. For this kind of photo, I often put it to its maximum in order to make lines and blacks more punchy! Please, notice I mentioned "for this kind of photo". It would be completely different if I was working on a portrait (or your model will probably hate you). Just try and you'll understand how it works.


As you may notice (I hope for you), your photo looks a bit "pale". Next steps will give it all the power it contains...


Step 3: Tone curve

Ok, that will begin to become interesting. The tone curve will determine the dynamic of your photo. To my mind, what makes a good black and white photo is to have white whites and black blacks. To do so, I often work with a "S" tone curve. Just adjust the curve till the result is good for you.


Admit it begins to have a face!


Step 4: Sharper

I give a bit more of "aggressiveness" to the photo in the "detail" menu. The main cursor to move is the "amount" cursor. You can adjust others to refine the result.


Step 5: Graduated filter


In order to give a better balance to the overall, I will use one or more gratuated filters. It is also possible to process that with the brush, but what you get on precision, you lose it on harmony: the brush is better to correct a precise point of the photo, not for an overall.
In this case, I apply three graduated filters in order to localy modify the exposition of three part of the photo.
Again I recommend you to play with that tool in order to understand how it works, it's really powerfull!


Step 6: Qualified black & white


Here is the last important step of our conversion. The aim is to play with "colors". Yes, I know, I talk about colors for a B&W photo. What you should understand here is that each color has its intensity, converted in grey levels during the B&W conversion phase.

As you can see, each colour is represented by a cursor that allows you to modify its specific grey level. Thanks to that, you can darken or lighten each part of the photo according to the color it depends.

No best practice here, it's at your own appreciation, try to make it looks like what you were feeling at the moment of the capture.


Last step: Final touch


This last step is really personal. Many people see vignetting like an optical default
. To my mind, it's a good way to highlight the subject of a photo. I often use it, like in this case. Once again, it's at your own appreciation.

Same approach with the grain. I like to break the perfect-looking-aspect of numeric photos. Try and manage it as you like!


Words of the end


That's it, you now know how I work with B&W photo processing. I really hope you enjoyed and (maybe) learned some things. Feel free to share this tutorial, next tutorials quality depends of your feedbacks... Don't hesitate!

Video example (with Lightroom 4)


Damien (http://dasm-photo.fr)